CHITIKA

Thursday, January 9, 2014

Create your own hotkey in DOTA

Create your own hotkey in DOTA with the "Dota Customkeys Generator". Here you can create any personal individual "Customkeys"!

The Customkeys Generator enables you to easily create your own standard Keys for spells and all other actions in Dota. It is an online tool which you can find here.

Its easy to use. Just click on a spell area, then hit a key (Example: Choose the first spell-box and press Q. Now pressing Q in the game releases the first spell on any hero). You have a lot of options that you can define in the nice generator like setting up shop keys too, for being able to buy Items faster. Try it out.

League of Legends Hotkey

League of Legends Hotkeys list:
This is a full list of all League of Legends hotkeys.

Here are the Hotkeys:

Chat commands and function


Enter

  • Toggles the chat (Default: Send message to allies only)

/all or shift+enter

  • Sends the chat message to all players in the game

/help or /?

  • Shows all commands with descriptions

/w or /msg

  • Respond to the last person who whispered you

/mute username

  • Blocks the defined username, you don't receive any message from this player.

/buddylist

  • Shows the active players of your buddy list in the chat window

/ff or /surrender

  • Starts vote for team surrender

/noff or /nosurrender

  • Votes against surrendering

/j or /joke or Shift+1

  • The champions joke track

/t or /taunt or Shift+2

  • The champions taunt track and animation

/d or /dance or Shift+3

  • The champions dance sequence

/l or /laugh or Shift+4

  • The champions laugh track and animation


Hotkeys and function

x

  • attack

q

  • first spell

w

  • second spell

e

  • third spell

r

  • ultimate

alt+q or alt+w or shift+e or shift+r

  • casts the spell under the mouse cursor

a

  • attack move

s

  • stop

h

  • hold ( like "stop" until it's lifted)

1-6

  • Item usage

7 or b

  • Blue Pill

d

  • Summoner spell 1

f

  • Summoner spell 2

z

  • chat history

arrow keys

  • scrolling

c

  • Hero Stats Page

p

  • Shop Window

Tab

  • Match Stats

g

  • toggle ping cursor

y

  • lock camera on champion

spacebar

  • center camera on champion

L

  • cycles through minion healthbar views

shift+L

  • Off/On champion healthbars

shift+K

  • Off/On Summoner names

ctrl+F

  • toggle FPS option

al+left click

  • pings location

alt+right click

  • control minion movement

shift+right click

  • attack move

F1

  • Select your champion

F2 - F5

  • select one of your teammates

F12

  • makes a screenshot

ESC

  • option menu


Wednesday, January 8, 2014

6.XX PRO CFW for PSP 1000 2000 3000 GO (SIMPLE)

This tutorial covers installing the latest 6.XX PRO series custom firmware for all PSP models. I have tried to include all firmware/PSP model combinations to help you decide which path to follow.

PSP 1000 – Install 6.60 PRO B-9


If Official Firmware is below 6.60

  1. aDownload OFW 6.60 - [Mediafire Link]
  2. Extract the file
  3. Copy EBOOT.PBP to PSP/GAME/UPDATE/
  4. From the xmb (main psp menu) run the update from Game – Memory Stick
  5. Now you are on OFW 6.60
  6. Download 6.60 PRO B-9 - [Mediafire Link]
  7. Extract the file
  8. Copy PROUPDATE and CIPL Flasher folders to PSP/GAME/
  9. From the xmb (main psp menu) run the PROUPDATE from Game - Memory stick.
  10. Press X to install CFW
  11. From the xmb (main psp menu) run the CIPL Flasher from Game - Memory stick.
  12. You have successfully installed 6.60 PRO B-9


If Official Firmware is 6.60

  1. Download 6.60 PRO B-9 - [Mediafire Link]
  2. Extract the file
  3. Copy PROUPDATE and CIPL Flasher folders to PSP/GAME/
  4. From the xmb (main psp menu) run the PROUPDATE from Game - Memory stick.
  5. Press X to install CFW
  6. From the xmb (main psp menu) run the CIPL Flasher from Game - Memory stick.
  7. You have successfully installed 6.60 PRO B-9


If Upgrading from any M33 Custom Firmware

  1. Download OFW 6.60 -[Mediafire Link]
  2. Extract the file
  3. Copy EBOOT.PBP to PSP/GAME/UPDATE/
  4. From the xmb (main psp menu) run the update from Game – Memory Stick
  5. Now you are on OFW 6.60
  6. Download 6.60 PRO B-9 - [Mediafire Link]
  7. Extract the file
  8. Copy PROUPDATE and CIPL Flasher folders to PSP/GAME/
  9. From the xmb (main psp menu) run the PROUPDATE from Game - Memory stick.
  10. Press X to install CFW
  11. From the xmb (main psp menu) run the CIPL Flasher from Game - Memory stick.
  12. You have successfully installed 6.60 PRO B-9


If Upgrading from 5.50 GEN or 5.50 Prometheus 4

  1. Open VSH menu by clicking on the Select button from xmb(main psp menu)
  2. Change USB device to Flash0
  3. Connect your psp to pc
  4. Navigate to \vsh\etc\
  5. Open version.txt using notepad or wordpad
  6. In the first line change the 9.90 to 5.50 and save.
  7. Disconnect your psp from the pc and change the USB device back to Memory stick in vsh menu
  8. Download OFW 6.60 - [Mediafire Link]
  9. Extract the file
  10. Copy EBOOT.PBP to PSP/GAME/UPDATE/
  11. From the xmb (main psp menu) run the update from Game – Memory Stick
  12. Now you are on OFW 6.60
  13. Download 6.60 PRO B-9 - [Mediafire Link]
  14. Extract the file
  15. Copy PROUPDATE and CIPL Flasher folders to PSP/GAME/
  16. From the xmb (main psp menu) run the PROUPDATE from Game - Memory stick.
  17. Press X to install CFW
  18. From the xmb (main psp menu) run the CIPL Flasher from Game - Memory stick.
  19. You have successfully installed 6.60 PRO B-9


PSP 2000 (Non TA-088V3 motherboard) - Install 6.60 PRO B-9


If Official Firmware is below 6.60

  1. Download OFW 6.60 - [Mediafire Link]
  2. Extract the file
  3. Copy EBOOT.PBP to PSP/GAME/UPDATE/
  4. From the xmb (main psp menu) run the update from Game – Memory Stick
  5. Now you are on OFW 6.60
  6. Download 6.60 PRO B-9 - [Mediafire Link]
  7. Extract the file
  8. Copy PROUPDATE and CIPL Flasher folders to PSP/GAME/
  9. From the xmb (main psp menu) run the PROUPDATE from Game - Memory stick.
  10. Press X to install CFW
  11. From the xmb (main psp menu) run the CIPL Flasher from Game - Memory stick.
  12. You have successfully installed 6.60 PRO B-9


If Official Firmware is 6.60

  1. Download 6.60 PRO B-9 - [Mediafire Link]
  2. Extract the file
  3. Copy PROUPDATE and CIPL Flasher folders to PSP/GAME/
  4. From the xmb (main psp menu) run the PROUPDATE from Game - Memory stick.
  5. Press X to install CFW
  6. From the xmb (main psp menu) run the CIPL Flasher from Game - Memory stick.
  7. You have successfully installed 6.60 PRO B-9


Upgrading from any M33 Custom Firmware

  1. Download OFW 6.60 - [Mediafire Link]
  2. Extract the file
  3. Copy EBOOT.PBP to PSP/GAME/UPDATE/
  4. From the xmb (main psp menu) run the update from Game – Memory Stick
  5. Now you are on OFW 6.60
  6. Download 6.60 PRO B-9 - [Mediafire Link]
  7. Extract the file
  8. Copy PROUPDATE and CIPL Flasher folders to PSP/GAME/
  9. From the xmb (main psp menu) run the PROUPDATE from Game - Memory stick.
  10. Press X to install CFW
  11. From the xmb (main psp menu) run the CIPL Flasher from Game - Memory stick.
  12. You have successfully installed 6.60 PRO B-9


Upgrading from 5.50 GEN or 5.50 Prometheus 4

  1. Open VSH menu by clicking on the Select button from xmb(main psp menu)
  2. Change USB device to Flash0
  3. Connect your psp to pc
  4. Navigate to \vsh\etc\
  5. Open version.txt using notepad or wordpad
  6. In the first line change the 9.90 to 5.50 and save.
  7. Disconnect your psp from the pc and change the USB device back to Memory stick in vsh menu
  8. Download OFW 6.60 - [Mediafire Link]
  9. Extract the file
  10. Copy EBOOT.PBP to PSP/GAME/UPDATE/
  11. From the xmb (main psp menu) run the update from Game – Memory Stick
  12. Now you are on OFW 6.60
  13. Download 6.60 PRO B-9 - [Mediafire Link]
  14. Extract the file
  15. Copy PROUPDATE and CIPL Flasher folders to PSP/GAME/
  16. From the xmb (main psp menu) run the PROUPDATE from Game - Memory stick.
  17. Press X to install CFW
  18. From the xmb (main psp menu) run the CIPL Flasher from Game - Memory stick.
  19. You have successfully installed 6.60 PRO B-9


If Official Firmware is between 6.20 and 6.39

  1. Downgrade to OFW 6.20 - [Mediafire Link]
  2. And then install 6.20 PRO B-9 permanent - [Mediafire Link]


If Firmware is 5.03 GEN/ 5.03 MHU/5.03 Prometheus

  1. Download OFW 6.20 - [Mediafire Link]
  2. And then install 6.20 PRO B-9 permanent - [Mediafire Link]


PSP 3000 (3g and 4g module) - Install 6.20 PRO B-9 Permanent


If Official Firmware is 6.20 or below

  1. Download OFW 6.20 - [Mediafire Link]
  2. And then install 6.20 PRO B-9 permanent - [Mediafire Link]


If Official Firmware is between 6.20 and 6.39

  1. Downgrade to OFW 6.20 - [Mediafire Link]
  2. And then install 6.20 PRO B-9 permanent - [Mediafire Link]


If Firmware is 5.03 GEN/ 5.03 MHU/5.03 Prometheus

  1. Download OFW 6.20 - [Mediafire Link]
  2. And then install 6.20 PRO B-9 permanent - [Mediafire Link]


PSP 3000 (7g and 9g module) - Install 6.60 PRO B-9


If Firmware is below 6.60

  1. Download OFW 6.60 - [Mediafire Link]
  2. Extract the file
  3. Copy EBOOT.PBP to PSP/GAME/UPDATE/
  4. From the xmb (main psp menu) run the update from Game – Memory Stick
  5. Now you are on OFW 6.60
  6. Download 6.60 PRO B-9 - [Mediafire Link]
  7. Extract the file
  8. Copy PROUPDATE and FastRecovery to PSP/GAME/
  9. From the xmb (main psp menu) run the PROUPDATE from Game - Memory stick.
  10. Press X to install CFW
  11. Please note that this is a temporary cfw. You will be back to OFW 6.60 if your psp shuts down. To get back to 6.60 PRO B-9 , just run FastRecovery from Game - Memory stick


If Firmware is 6.60

  1. Download 6.60 PRO B-9 - [Mediafire Link]
  2. Extract the file
  3. Copy PROUPDATE and FastRecovery to PSP/GAME/
  4. From the xmb (main psp menu) run the PROUPDATE from Game - Memory stick.
  5. Press X to install CFW
  6. Please note that this is a temporary cfw. You will be back to OFW 6.60 if your psp shuts down. To get back to 6.60 PRO B-9 , just run FastRecovery from Game - Memory stick


PSP Go - Install 6.20 PRO B-9 Permanent


If Official Firmware is 6.20 or below

  1. Download OFW 6.20 - [Mediafire Link]
  2. And then install 6.20 PRO B-9 permanent - [Mediafire Link]


If Official Firmware is between 6.20 and 6.39

  1. Downgrade to OFW 6.20 - [Mediafire Link]
  2. And then install 6.20 PRO B-9 permanent - [Mediafire Link]

6.x To 6.20 Dowgrader [LINK]
PSP Module Checker [LINK]

For more info click here


PSP 6.60 HEN


This is a homebrew enabler for all PSP with 6.60 OFW. It's like a CFW with less features.
  • No Plugin support
  • No Recovery Menu
  • No custom ps1 support

But if you use the PSP just to play games, and you don't want a complicated custom firmware, then this HEN is your answer!
Just launch it (test for 660) on the GAME icon. When back to XMB you can play your ISO/CSO games immediately. No installation needed.


How to transfer to your PSP:
  • Connect PSP to your PC
  • Extract the zip file
  • Copy 6.60 HEN folder in ms0:/PSP/GAME folder.
  • Disconnect from PC


How to enable:
  • Just launch it (test for 660) on the GAME icon
  • When PSP reboots, go to System Settings / System Information
  • System Software should show 6.60 Test
  • Done!


How to put Games (ISO/CSO):
  • Connect PSP to PC
  • Make a folder inside your memory stick (ms0:/) then name it ISO
  • Put all your .iso or .cso games inside this folder
  • Disconnect PSP
  • Done!

PS Vita Application


Open CMA

A patch by Virtuous Flame to prevent the PS Vita Content Manager Assistant from connecting to the internet.
The PS Vita comes with a system to copy save files that requires you to be connected permanently to the internet. This system is here to force you to update the Vita when a new version is available. In addition, it might be inconvenient for you to be constantly connected when you want to copy your files from and to the Vita. This patch is here to help you with this situation

Installation:
1. Extract the archive in your CMA folder (program files/Sony/Content Manager Assistant by default).
2. Quit the CMA if it is running on your PC.
3. Execute "run.bat" (you need to run it in "Admin mode" on windows 7.
4. That's it, now the CMA should run without requiring to be connected to the internet.

Latest Version : r3
Release Date: 2012/01/7

Notes for this version: 

Changelog:
  • patched CMANPlib.dll to prevent it sending POST to PSN server
  • prevent CMA to upgrade (with a fake CMAVersion.xpd)

Downloads

Direct Download Link

Alternate Link Download

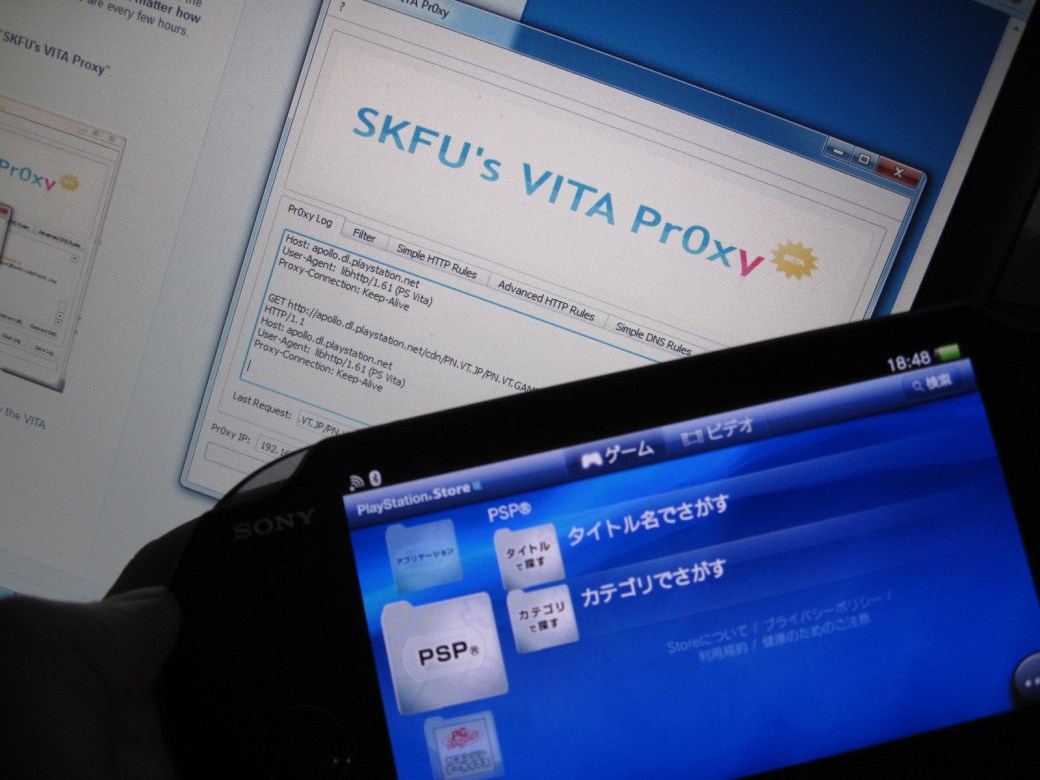
SKFU's Vita Proxy

This application in beta stage currently has the following features:
  • Proxy especially for PS VITA, but surely works for anything
  • Filters especially for PlayStation Network traffic
  • Automatic fixes of misformated URL's
  • Raw data, DNS, and URL replacement 
  • "Last request" fast access
  • SSL support
  • Save Logs
  • Save Settings
  • Clear Logs clears Last Request
How to use

Installation and usage are fairly simple. Just install Vita pr0xy and run it. At the bottom of the window, you will see the IP of your proxy (your computer’s IP) as well as the port. Press “start”, at this point your firewall might ask you if it is ok for the proxy to open the ports.

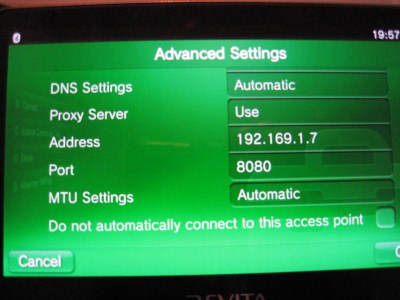
On the vita side, in your wifi’s connection settings, go to Advanced, select “use proxy”, and enter the proxy IP and port (the ones displayed in the Vita pr0xy window).


Vita Proxy settings

You’re all set, try to display a web page in the vita browser, if everything works correctly the page should display and Vita pr0xy should start logging stuff.


Download 
version 1.01


VHBL For Everybody’s Tennis 

Vita Half-Byte Loader is a project to port the PSP
homebrew loader HBL to the Playstation Vita, through the PSP emulator on the Playstation Vita.

This is the official VHBL download page for people who own a copy of the PSP Game Everybody’s Tennis (also known as Hot Shots Tennis, or Minna no Tennis). If you don’t own this game, go back to the VHBL page to see if we have a version of VHBL working with a game you own.

Choose the file that matches your version of the game:

VHBL R137 for Everybody’s Tennis (EU/JP/US)
VHBL R137 for Everybody’s Tennis (HK)

How to Install and Run HBL on Everybody’s Tennis

  1. It is *strongly* recommended that you turn of all wireless connections on your PS Vita, and that you use OpenCMA on your PC instead of the regular CMA. This is recommended because otherwise your console has a way to force you to upgrade the firmware even before you get a chance to use the exploit.
  2. Extract the HBL archive matching your version of the game in your CMA PSP Savedata folder. It is a folder on your PC named PSSAVEDATA/[lots of random characters here]. If you don’t know where it is, check your settings in CMA
  3. Connect your PS Vita to the PC through the CMA, it should give you the possibility to copy the savedata from your PC to the Vita. If not, you probably extracted it in the wrong folder. (Note: You will also want to install some homebrews with a similar technique, read the section below)
  4. Important for owners of the European version of the game: Before running Everybody’s tennis, you need to change the language of your PS Vita/PSP to French. This is a limitation of the exploit for now, this might or might not change in future revisions. you can of course switch your console back to your own language once you are done playing with VHBL.
  5. To run HBL, start the Tennis game, select “Continue” in the Main Menu. At this point, HBL should start

How to Install and Run Homebrews


Installing homebrews on the PSP was an easy task. On the Vita, until better solutions are provided, it’s quite a pain in the ass.
The CMA will only let you copy savedata, and will not recursively browse folders.

To address this, HBL comes with a tool that can extract archives with a specific structure.

  1. Packaging the homebrew for installation on the Vita:
  2. download PSP homebrews from your favorite website
  3. extract the homebrew somewhere on your hard drive, and with your favorite utility, zip it again with the *store* setting (no compression), in a file that you will name “install.zip”
  4. take any PSP savedata (but not the one used for HBL!), and add the “install.zip” to that folder, in your PC CMA folder. so your PSP Savedata will look something like this:
  5. in folder PSSAVEDATA/1a2b3c4def5678/UCUS12345000/ (or something like this) you will have the following files:
    • ICON0.png
    • PIC1.png
    • DATA.bin
    • PARAMS.SFO
    • install.zip

Here you can download an example of packaged homebrew: Doom

Installing:
  1.  run OpenCMA on your PC, and CMA on your Vita
  2. copy the previously packaged SAVEDATA (see above) with your homebrew in “install.zip” on your Vita
  3. run HBL (how to run HBL is explained in the previous section)
  4. navigate with the HBL menu to the SAVEDATA folder, then go to the folder you just downloaded (in my example, UCUS12345000), and clikc cross or circle on it
  5. At this point, the HBL menu should ask you if you want to install the homebrew. select yes, and wait until HBL is done extracting your homebrew
  6. The homebrew is now installed, and you can run it by going to the GAME folder, if everything went well, a new subfolder with your homebrew has been created here, and you can run the homebrew

Need more help? Check our forums for more downloads and tutos
More

OpenCMA is strongly recommended to install if you want to use VHBL. Open CMA is a tool by Virtuous Flame that allows you to copy files from and to your vita without being connected to the internet. This is useful, especially if you don’t want Sony to forcefully update your firmware.

Looking for homebrews that run on VHBL? Check this list of 15 essential homebrews that run fine with VHBL


Vita Half-Byte Loader For Motorstorm Arctic Edge


Vita Half-Byte Loader is a project to port the PSP homebrew loader HBL to the Playstation Vita, through the PSP emulator on the Playstation Vita.

This is the official VHBL download page for people who own a copy of the PSP Game Motorstorm Arctic Edge (also known as Motorstorm Raging Ice). If you don’t own this game, go back to the VHBL page to see if we have a version of VHBL working with a game you own.

Check the VHBL page for more details on this tool.

The latest version of VHBL for Motorstorm Arctic Edge is r141. The Archive contains the loader for all versions of the game (choose the one that matches your country when you unzip the archive)

VHBL For Motorstorm r141 – EU/US/KR/JP

How to Install and Run HBL on Motorstorm Arctic Edge

  1. It is *strongly* recommended that you turn of all wireless connections on your PS Vita, and that you use OpenCMA on your PC instead of the regular CMA. This is recommended because otherwise your console has a way to force you to upgrade the firmware even before you get a chance to use the exploit.
  2. Extract the Folder matching your country from this HBL archive in your CMA PSP Savedata folder. It is a folder on your PC named PSSAVEDATA/[lots of random characters here]. If you don’t know where it is, check your settings in CMA
  3. Connect your PS Vita to the PC through the CMA, it should give you the possibility to copy the savedata from your PC to the Vita. If not, you probably extracted it in the wrong folder. (Note: You will also want to install some homebrews with a similar technique, read the section below)
  4. To run HBL, start the Motorstorm game, select “Load” in the savegame menu, open the HBL savegame, then go to “Wreckreation > Time Attack” and select “No”. At this point, HBL should start. 

How to Install and Run Homebrews

Installing homebrews on the PSP was an easy task. On the Vita, until better solutions are provided, it’s quite a pain in the ass.
The CMA will only let you copy savedata, and will not recursively browse folders.

To address this, HBL comes with a tool that can extract archives with a specific structure.

  1. Packaging the homebrew for installation on the Vita:
  2. download PSP homebrews from your favorite website
  3. extract the homebrew somewhere on your hard drive, and with your favorite utility, zip it again with the *store* setting (no compression), in a file that you will name “install.zip”
  4. take any PSP savedata (but not the one used for HBL!), and add the “install.zip” to that folder, in your PC CMA folder. so your PSP Savedata will look something like this:
  5. in folder PSSAVEDATA/1a2b3c4def5678/UCUS12345000/ (or something like this) you will have the following files:

    • ICON0.png
    • PIC1.png
    • DATA.bin
    • PARAMS.SFO
    • install.zip
Here you can download an example of packaged homebrew: Doom

Installing:
1) run OpenCMA on your PC, and CMA on your Vita
2) copy the previously packaged SAVEDATA (see above) with your homebrew in “install.zip” on your Vita
3) run HBL (how to run HBL is explained in the previous section)
4) navigate with the HBL menu to the SAVEDATA folder, then go to the folder you just downloaded (in my example, UCUS12345000), and clikc cross or circle on it
5) At this point, the HBL menu should ask you if you want to install the homebrew. select yes, and wait until HBL is done extracting your homebrew
6) The homebrew is now installed, and you can run it by going to the GAME folder, if everything went well, a new subfolder with your homebrew has been created here, and you can run the homebrew

Need more help? Check our forums for more downloads and tutos
Older versions

Compatibility problems? Want to try an older version of VHBL? Check the Motorstorm VHBL Download archive
More

OpenCMA is strongly recommended to install if you want to use VHBL. Open CMA is a tool by Virtuous Flame that allows you to copy files from and to your vita without being connected to the internet. This is useful, especially if you don’t want Sony to forcefully update your firmware.

Looking for homebrews that run on VHBL? Check this list of 15 essential homebrews that run fine with VHBL

credits to wololo and for the other people who discovered the exploit


Unbrick PSP

PRXUnbricker is program for PSP which can UNBRICK your PSP.


How to Repair index_0Xg.dat:

1. Download PRXUnbricker
2. Open and extract files from RAR
3. Go to RECOVERY Menu and select "Toogle USB"
4. Copy folder PSP to ms0:/
5. Copy folder index_0Xg.dat to ms0:/seplugins 
6. Disconnect PSP from PC
7. In RECOVERY Menu select "Run Program at ms0:/PSP/GAME/RECOVERY/EBOOT.PBP"
8. Choose Repair index_0Xg.dat
9. Enjoy!!!

How to Repair Flash1:

1. Download PRXUnbricker
2. Open and extract files from RAR
3. Go to RECOVERY Menu and select "Toogle USB"
4. Copy folder PSP to ms0:/
5. Copy folder flash1 to ms0:/seplugins
6. Disconnect PSP from PC
7. In RECOVERY Menu select "Run Program at ms0:/PSP/GAME/RECOVERY/EBOOT.PBP"
8. Choose Repair Flash1
9. Enjoy!!!

PRXUnbricker download

Wednesday, January 1, 2014

Warcraft Version Switcher + Patch

Warcraft Version Switcher WVS
All in One Warcraft Version Switcher. Yeah, it's available now. Currently, there are 7 Warcraft 3 TFT versions archived files are available, Warcraft Patch 1.20e, 1.21, 1.21b, 1.22, 1.23, 1.24a, 1.24b, 1.24c, 1.24d, 1.24e, 1.25b, 1.26a. You can download any Warcraft 3 Patch version Switcher file you want to use. Check the download links & guide..
Steps:

1. Download the Warcraft 3 version switcher and it's individual file(s) you want to use with Version Switcher.

Download Warcraft Version Switcher:
versionswitcher.zip

Warcraft 1.20e Patch File:
warcraft tft 1.20e patch

Warcraft 1.21b Patch File:
warcraft tft 1.21b patch

Warcraft 1.22 Patch File:
warcraft tft 1.22 patch

Warcraft 1.23 Patch File:
warcraft tft 1.23 patch

Warcraft 1.24 Patch File:
warcraft tft 1.24 patch

Warcraft 1.24b Patch File:
warcraft tft 1.24b patch

Warcraft 1.24c Patch File:
warcraft tft 1.24c patch

Warcraft 1.24d Patch File:
warcraft tft 1.24d patch

Warcraft 1.24e Patch File:
warcraft tft 1.24e patch

Warcraft 1.25b Patch File:
warcraft tft 1.25b patch

Warcraft 1.26 Patch File:
warcraft tft 1.26 patch


2. After Downloading the patch version file(s), DO NOT EXTRACT THEM. Just copy the files and paste in your "wvs" folder of Warcraft Version Switcher.

3. Now run wvs.exe & you're done.
PLAY DOTA 2 LAN

updated dedicated server enabler files:
mediafire link download

Original guide:
mediafire link download

More info:
Click here for more tricks and info


Offline LAN Dedicated Server Guide By: StoneCold For the NewsHost Community v.1.0

Introduction This guide will show you how to host your own dedicated server for playing DotA 2 offline.
Wait a minute, did he just say offline, as in, play DotA 2 on LAN without an internet connection ? Yes, you read correctly, it is possible to play DotA 2 offline, thanks to some ingenious Chinese crackers. They did create a frontend client which simplifies the procedure, however, it isn't worth while for those of us who only speak English as the application is written in Chinese. This guide will not include any references to the application they made as it is useless to us. This guide will cover the following aspects:
Step 1 - Requirements 
Step 2 - Installation instructions 
Step 3 - Server and client configuration 
Step 4 - Connecting to the server and picking a team 
Step 5 - Final Word It's very important that you READ all of the instructions carefully for each section, because if you misread something then chances are that you're going to make a botch of your installation and might blame me and say but "this doesn't work". It does work, myself and a couple of friends already tested it, so what I'm about to share with you is legit. So without further a due, let's get started!

Step 1 - Requirements You'll need the following to get everything working, luckily it's not a lot: 
a) The Steam client with a copy of DotA 2 on your Steam account 
b) One command line switch that you need to add to your DotA 2 link in your Steam library 

Step 2 - Installation instructions 
a) First things first, navigate to your dota 2 beta directory located in: Steam\steamapps\common\ 
b) Make a copy of your dota 2 beta folder and rename it to "dota 2 server" after it has finished copying. At this stage, you should have 2 folders: - your original dota 2 beta folder (which will act as your client) - a copy of your dota 2 beta folder (which will act as your server) 
c) Download the dedicated server enabler files which I uploaded at NewsHost (sorry, but it's a NH exclusive, so I won't be posting external links to the files in the guide). 
d) Extract the dedicated server enabler files into the root of your dota 2 server folder (When prompted to overwrite the files, do so) 
e) Next, you need to make one modification to your dota 2 client in your Steam library 

Step 3 - Server and client configuration Client configuration: 
a) Right-click on Dota 2 in your Steam library, choose "Properties" 
b) Once the "Properties" tab is open, click on the "Set Launch Options" button 
c) In the dialog box that opens, type "-console" (without the quotation marks) 
d) Click on the "Ok" button, and then on the "Close" button e) Your client is now ready to connect to the server PS: Take note that enabling the console feature does NOT affect your game in any way, so you'll still be able to play the game online like you normally would. To close the console after the game loaded, press the tilde button "~" (it's located above the Tab button, to the left of "1" on your keyboard)

Server Configuration: 
f) Ensure that you have extracted the dedicated server enabler files in your dota 2 server folder at this stage g) Edit the server.bat file according to your liking
You should see the following inside the .bat file: 
revLoader.exe -launch sv.exe -game dota -window -console -insecure +hostname DotA_2 +sv_lan 1 +ip 127.0.0.1 +dota_wait_for_players_to_load 1 +dota_wait_for_players_to_load_count 10 +dota_wait_for_players_to_load_timeout 60 +dota_force_gamemode 1 +dota_start_ai_game 1 +map dota_winter.bsp 
As you can see there are quite a lot of command line switches here and each of them does a specific function. Try not to edit the majority of them, otherwise you might remove something that is crucial to the functioning of the server, but you can experiment (but do so at your own risk). You might want to edit the following "basic" settings to get a server started: +ip 127.0.0.1 (this IP address must reflect the server PC's LAN IP address, for e.g. 192.168.1.1) +dota_force_gamemode 1 (this command determines what type of mode the server should run as) Here's a list of gamemodes you can get from dota_force_gamemode (with each number referring to a specific game mode that you can specify with the "dota_force_gamemode" command): 
1. All Pick 
2. Captain's Mode 
3. Random Draft 
4. Single Draft 
5. All Random 
6. Unknown (Looks like it has only a pool of heroes for "new players", and a 3 minute picking time) 
7. Diretide 
8. Reverse Captain's Mode 
9. The Greeviling 
10. Tutorial 
11. Mid Only 
12. Least Played 
13. New Player Pool (same as 6 except with 1 minute picking time and non-playable heroes grayed out instead of not visible) 
Everything else after 13 shows up as #game_mode_xx, and is just all pick. Feel free to experiment with the different modes, I didn't test all of them.

h) +dota_start_ai_game 1 (I didn't really experiment with this command, I think it forces the server to start an "All Pick" mode with bots enabled, so I guess you can try the numbers stipulated above in conjunction with this command and see if it works that way. 
Alternatively, you can also have a look at the server.cfg file located in "dota 2 server\dota\cfg" where you'll find these two commands: 

dota_bot_disable "0" (if set to 1, it should completely disable the bots from joining any game you host on the dedicated server) 
dota_bot_set_difficulty "3" (Here you can set a value from 0 to 3, don't know if it's from easiest to most difficult, or vice versa, feel free to experiment) i) +map dota_winter.bsp (this command as you would've guessed it changes the map you play on)

There are four maps available, with the 5th being the tutorial map: 
"dota" 
"dota_autumn" 
"dota_diretide_12" 
"dota_winter" 
"tutorial_m1" 
And that's basically it with regards to all of the most pivotal commands you'll most likely want to change on your server. Keep in mind that you cannot add too many command line switches in the server.cfg batch file, otherwise it will give you an error when starting the server. For the other commands I didn't cover, feel free to experiment and see what they do, as I'm not going to cover each one of them in detail as part of the guide. 

Step 4 - Connecting to the server and picking a team 
a) Once you've setup all the settings that you want, start the server by running the "server.bat" file 
b) Two command windows will open, the one will just list all of the settings in the batch file that you specified and can be closed after the server is fully running. The other window is basically the server itself and should be minimized to the taskbar. 
c) The machine running the dedicated server doesn't require Steam in order to run (please note, that I didn't fully test this on a PC without internet access, I merely closed Steam on my server machine, but it still had an internet connection and the server ran. But not having Steam on the server machine, shouldn't be a problem.) 
d) If your dedicated server started successfully, you should see something similar to the screenshot I posted on the next page (See Figure 4.1):

Figure 4.1 - Dedicated server console window 
e) If everything is in order with regards to the server, you can proceed to 
f), otherwise retrace your steps from Step 2 - Installation Instructions on page 3. f) 
If you want to play DotA 2 offline on LAN, let's say at an event such as OC or rAge, everyone that wants to play MUST have the following: * All players must have the same version of DotA 2 in Steam If anyone gets a server or version mismatch when trying to connect to the server, that particular person in question needs to update his "dota 2 beta" folder's content with the contents of someone's "dota 2 beta" folder who can connect to the dedicated server. * All players must run their Steam client in "Offline" mode to connect to the server. If an internet connection is present on a client machine on the LAN, it won't affect your ability to connect to the server. Offline mode can be accessed from the "Steam" menu in the Steam client, see Figure 4.2 below:

Figure 4.2 - Enable Steam to run in offline mode
Once you've clicked on "Go Offline", you'll be prompted to restart Steam in "Offline mode".
g) Once Steam has restarted in offline mode, go back to your library and before you launch the game, make sure that you've enabled the console command line switch for DotA 2 (see Step 3 - client configuration)
h) Start DotA 2 via Steam, you'll notice that the console window will be open as well once you're at the main menu i) In the console window, you need to type "connect " and then specify the IP address of the server machine on your LAN. For e.g. "connect 192.168.1.1" and press "Enter" (see Figure 4.3 below):

Figure 4.3 - Console window j) Once you're connected to the server, you'll notice that it looks a little bit different than what you would normally see when playing online

Figure 4.4 - All Pick mode, but you can't choose a side k) As you can see from the screenshot above, you can't pick a side, therefore you'll need to do it via the console by using the "jointeam" command. The available options are: jointeam "good" (radiant) jointeam "bad" (dire) jointeam "spec" (spectator) Once you've selected a side, your name will then appear under the team you selected (see Figure 4.5):
Figure 4.5

Figure 4.5 - Team selection screen after manually specifying a team via console
TAKE NOTE:
There is grace period of 1min 30 seconds whereby all players (10 max) should connect to the server. If you have bots enabled, all the empty player slots will be filled by bots automatically on both sides once the timer hits zero. I haven't tested if the game will start if you uneven teams with only human players. Secondly, I highly doubt that any players will be able to join a game in progress. What I have tested though, is that you can reconnect again if you get disconnected during a match and there appears to be no time restriction on that. l) After the timer hits zero, you can pick your hero. There is also a 30 seconds timer on the hero select screen but I suppose those of you who play "All Pick" mode knew that already. Anyhow, once the countdown timer hits zero, bots will automatically join the game (see Figure 4.6 below):
[img]
http://nbaimg.com/images/73527214314108515122.jpg[/img]
Figure 4.6 - Bots automatically joining teams in "All Pick" mode m) Once you've picked your hero, next you'll be presented with the "Player Item" screen

Figure 4.7 - Player item screen n) If you have unlocked certain items for heroes when playing online, you will see them here, but unfortunately you won't be able to use them in game. This is the only limitation to the core game play mechanics but I suppose it's a small price to pay for playing the game offline on LAN. o) Hit the "Play" button and as the announcer would say "Prepare for battle!" p) Once the game has concluded, everyone needs to disconnect from the server, otherwise the server will keep on idling. You can disconnect from the server by typing "disconnect" (without quotes) in the console. q) If you'd like to play another match or change the gamemode / disable bots etc, close the server window and simply restart the server with any modifications that you apply in the "server.bat" file. r) Once the server restarted, everyone can reconnect again with the "connect <ip address>" command. 

Step 5 - Final Word Keep in mind that this tutorial should work for any future patches to the DotA 2 client. If a new update is released via Steam, remember to make a new copy of your folder which will include any new updates. Simply reapply your dedicated server enabler files to the newly updated server folder you made and you should be ready to rock and roll. Therefore, remember to backup your server.bat and any other modifications you might have made to the server files. Any new updates to the dedicated server enabler files will be released by me on NewsHost. Any questions should be directed at me, StoneCold, on NewsHost's forums if you have any trouble regarding the instructions in the guide. Have fun and enjoy !
END OF GUIDE